Check out the community portal for ways in which you can help the Wiki of Mana! Also, keep in mind that this wiki contains unmarked spoilers.
Secret of Mana
- This article is about the original Super Nintendo and mobile versions. For the game's HD remake, see Secret of Mana (remake).
| Secret of Mana | |||
|---|---|---|---|

| |||
| Developer | Square | ||
| Publisher | Square | ||
| Platforms | Super Nintendo Entertainment System, Virtual Console (Wii, Wii U), FOMA 903i, iOS, Android, Nintendo Switch, Super NES Classic Edition | ||
| Release date | Super Nintendo: Virtual Console (Wii): FOMA 903i: EZweb: iOS: Worldwide: December 21, 2010 Virtual Console (Wii U): Android: Worldwide: October 30, 2014 Super NES Classic Edition: | ||
| Genre | Action role-playing | ||
| Rating(s) |
| ||
| Mode(s) | Single player, multiplayer | ||
| Media | Cartridge, Digital download | ||
| Input | Controller | ||
Secret of Mana is the second installment of the Mana series. It was both developed and published by Square. The game was originally released for the Super Nintendo Entertainment System in 1993. Ever since its release, the Mana series was formed, specifically to disconnect from the Final Fantasy franchise, which only includes the first Mana title, Final Fantasy Adventure.
Similar to The Legend of Zelda series, Secret of Mana features real-time battles, although like Final Fantasy Adventure, it has an Attack Gauge that, when filled, allows the player's character to inflict the highest damage to their target. Instead of a generic pause interface, the game introduces the Ring Command menu system, which the player can access by pausing the game to make certain decisions, such as use an item or equip a different weapon. For a large duration of the game, the party consists of three characters, who simultaneously fight at once. A second and even a third player, if they connect a third controller via the Super Multitap peripheral, can join in to control the second and third characters respectively.
In 2008, Secret of Mana was ported to the Wii's Virtual Console, and in 2013 it was ported to the Wii U's Virtual Console, although only in Japan. In 2009, Secret of Mana was released for FOMA 903i mobile phones and then for EZweb in 2010. In late 2010, the game was ported to iOS devices and then to Android devices in 2014. The original Super Nintendo version is one of the three titles included in the Collection of Mana compilation and one of the 21 games included on the Super NES Classic Edition. In 2018, an HD remake of the game was released for the PlayStation 4, PlayStation Vita, and Microsoft Windows.
Story[edit]
- Title screen
Darkness sweeps the troubled land, as Mana’s power fades… people await a hero who will wield the sword… Excalibur, Herald, Gigas, the blade has had many names, for it has been celebrated in myths and legends throughout time. But all these speak to just one weapon: the Sword of Mana.
- Prologue
Using the power of Mana, a civilization had grown strong… In time, Mana was used to create the ultimate weapon: the Mana Fortress… This angered the gods. The sent their beasts to destroy the Fortress… A violent war rock the world, and Mana seemed to disappear… Before all was lost, a hero with the Mana Sword smashed the Fortress… Though the civilization had been destroyed, the world was peaceful again. But time flows like a river… and history repeats…

Upon hearing a villager mentioning something shiny lurking near the local falls, Elliot, Timothy, and Randi go there to investigate despite knowing all too well the area was off limit. While crossing a large waterfall on a narrow catwalk, Randi slips and falls into the basin far below, leaving his two friends scurrying back to the village. While exploring the lower grounds, the young lad starts hearing a mysterious voice beckoning him. He eventually finds a rusty sword wedged inside a rock. Prompted by the otherworldly echoes, he pulls out the weapon, all the while the voice coalesces into a ghostly knight. The apparition declares he entrusts the sword to Randi and disappears in a blinding light.

With his new cutting tool at hand, the young man disposes of the overgrown weed previously blocking his path and made his way back to his hometown. He finds the populace in disarray, complaining about the light coming from the waterfall and the recent surge of monsters swarming the village’s outskirts. Upon reuniting with his mates and meeting with the elder, he learns that pulling out the Mana Sword from its pedestal has made monsters appears all over the area, dooming the town. Hearing the news, Elliot starts pummeling the poor boy backwards, blaming him from all that happened. A sudden earthquake is felt, creating a hole below the two boys, sending them several feet under the earth. There, Randi is forced to defeat a giant praying mantis while being assisted by a travelling swordsman. After taking care of it, the boys are hoisted back up and the older man introduces himself as Jema and directs him to the Water Palace to seek out the aid of Sage Luka. After him leaving the village, Randi is asked by Timothy to go to the Elder’s house for an emergency meeting. There, the villagers are all gathered to coerce the village chief into banishing Randi from Potos for his crimes. The old man obliges and tells the young lad to leave the village after he finishes his business here. He later confides in the young lad that her mother brought him up to Potos when he was just a baby, and he raised him as his own. After parting with his adoptive father, Randi leaves his hometown for good and makes his way to the Water Palace.

After taking the Cannon Travel center, the boy lands near the Water Palace where a small troop of soldiers from Pandora were stationed in. He learns that their commander Dyluck was sent to eliminate a witch from the Haunted Forest. Moments after, he crosses path again with Jema who waited at the Palace’s entrance to greet him. During his audience with Sage Luka, he learns him pulling out the Mana Sword caused a shift in Mana all over the world, causing monsters to appear. Should he defeat monsters and obtain their orbs he could reforge the holy blade back to full power. The Empire also seeks to revive the Mana Fortress of yore by breaking the seals of each Mana Palace. Luka then entrusts Randi to seek out the eight temples’ Mana Seeds and receive their power. Jema leaves for the town of Pandora to seek an audience with the king while Randi is tasked to head to Gaia’s Navel to gain the Dwarfs’ help. The seeress gives the adventurer a spear as a parting gift.

While heading to his next destination, Randi is ambushed by goblins and put in a boiling stew for their main dish. Shouting for help, he grabs the attention of a female bystander, who quickly lets him out of his gloomy demise. As he is about to thank her, however, she claims she mistook him for someone else, and quickly leave the premises without disclosing her name.
Later, Randi reaches the town of Pandora, where he is advised by a standing guard to refrain from talking to people. He soon learns the realm is plagued by a curse turning citizens into zombies, wandering aimlessly. While exploring the castle, Randi bumps into the girl from earlier storming out of an arranged marriage meeting. Upon learning he is a swordsman, the lady going by Primm urges him to go to the Haunted Forest to deliver her fiancé Dyluck from the evil witch’s clutches and the two of them decide to team up. However, after deciding to follow his initial plan to explore Gaia’s Navel, Primm leaves to look for her lover by herself, angered at his stubbornness to head to the cave first.

Randi finds the Dwarf Village in the deepest part of the subterranean maze, where he encounters Watts the blacksmith who offers to forge his sword for 100 GP. Upon touching the holy blade, the dwarf’s hammer gains the ability to forge orbs into weapons. Overjoyed, he tells the boy to come later to receive another weapon. Randi decides to explore the village to pass time and comes across a shoddy sideshow run by the Dwarf Elder. He ends up paying a hefty sum of money for falling for the whole charade which involves helping a stray sprite pay back their debt. After discovering their ruse, he gets his money back, but is immediately whisked away by a rumble, sending them right in front of a giant carnivorous plant monster. After getting rid of the threat, the Dwarf Elder reveals that the beast has unearthed the entrance to the Underground Palace. However, it is still sealed by lava and the protagonist must ask Elinee the witch to undo the chant. The young sprite named Popoi is said to have washed up in Gaia’s Navel after a great storm flooded the area, losing their memory in the process. They decide to join Randi after hearing they may regain their memory should they come in contact with the Mana seeds. After receiving a bow from the Dwarf Elder, the team returns to Watts who gives them an axe and makes a shortcut to the surface.

The party ventures into the Haunted Forest only to find a distressed Primm fighting two werewolves. The young lady reunites with Randi and they resume their search for the Witch’s Castle. They found the old crone deep within her lair, about to teleport Dyluck to her master Thanatos at the ruins in Pandora. She claims her magic didn’t work properly on her and that the Mystic Knight from the Empire will invade Pandora once they’ll be no more sane troops to defend the realm. She then release her pet tiger to feast on the adventurers. The trio takes care of the furry beast, breaking the enchantment on Elinee. She reverts back to a regular old woman, telling them the magical herbs she once gathered in the forest withered. She made an oath with Thanatos and exchanged the souls of the villagers to maintain her powers. She adds that the Pandoran commander has already been warped to the ruins, and then advises the party to gain the magic of ice to neutralize the Underground Palace seal. Elinee finally gives the trio a whip as an apology before they head for their next destination. Back outside the castle, they hear Luka speaking to them telepathically, telling them to come to the Water Palace at once.
Returning to the temple, Sage Luka informs the party that Undine, the elemental of water might be in trouble as the barrier around her hideout has disappeared as of late. The adventurers venture into the cave, where they battle an overgrown reptile guarding the entrance to the water spirit room. There, Undine bestow upon Primm and Popoi defensive and offensive magic respectively. Randi asks what about him, but she replies the Mana Sword will once wield magic unrivaled by any other spells. She then gifts a polearm to the party before officially joining the party.

Now infused with ice magic, the party returns to Dwarf Village where the entrance to the Underground Palace lies and break the seal by casting and ice spell. There, they proceed deeper into the vestiges when they meet with an irate magical creature, shouting at them from barging into the altar room. Popoi tries to brawl with them, awakening a fiery giant the party needs to take down. The earth spirit Gnome thanks them afterwards and decides to join the group. Randi then synchronizes the Mana Sword with the seed to gain its power, then Popoi tries to focus their mind into it to regain some of their memories. They claim to hail from the forest in the Upperland, gaining new clue as to where the party might explore next.

Sage Luka, however, is worried about Jema not coming back from his audience with the king in Pandora, and ask the adventurers to look into it. While wandering around Pandora, they find a dazed friend of Primm named Pamaela, who immediately disappears upon talking to her. The team finds her near the ruins’ entrance excited about the idea of being sacrificed. Primm tries to snap her out of it, but Pamaela slaps her in retaliation, and then storms into the ancient structure. The party chases after her all the way to the back of the ruins, where they finally meet with Thanatos, who already drained Primm’s friend & Dyluck of their energy. He then activates a trap under their feet, sending them crashing down into a sacrifice chamber where they must defeat the very source source who drained all the souls of Pandora. They succeed, but are too late to confront the Mystic Knight who eloped along with Dyluck & Pamaela, but not after lifting the curse on the kingdom. They find Jema amidst the victims, who explains that Thanatos is one of the best officers of the Empire. He then entrusts the party to revisit Luka while he’s investigating the Underground Palace.

Back to the Water Palace, they learn to their horror that the Mana Seed has been stolen. According to Luka, however, doesn’t seem to have been perpetrated by the Empire. She has a vision of the water seed in the confines of Gaia’s Navel, where the party decides to investigate. There, they find Jema and the Dwarf Elder overlooking a large hole in the middle of Dwarf Village. Randi’s mentor explains that the thieves are drilling a hole toward the Underground Palace as they are after its Mana Seed. He entrusts the trio to chase after the thieves while he’s defending the palace. The party agrees and sneak into the Thieves’ Ship, where they meet face to face with the robbers calling themselves the Scorpion Army. Their leader, the Scorpion Boss claims they will someday rule the world with the power of the Mana seeds. They jump into their mechanical robot Kilroy to confront the protagonists, but end up overpowering their machine thanks to the energy of the stolen Mana seed. The trio thwarts their plans and the odd gang is forced to retreat. Once back in Dwarf Village, the elder thank them for their hard work, mentioning Jema retreated along with Pandoran soldiers. He gives the party a peculiar mallet as a reward.

Heading back to the Water Palace, they find the whole area infested with monsters, with Sage Luke being held hostage by the Empire. The commanding officer of the operation introduces himself as Geshtar of the Vandole Empire. He threatens the party to hand over the Water Seed lest they want Luka to suffer a dire fate, but the protagonists are either way forced to yield to the general. Geshtar breaks the Mana seed’s seal, then pits the party against his personal pet Jabberwocky. The trio defeats the two-headed dragon, then seal the Water Seed back as instructed by Luka. Jema, who came into the scene a moment ago, explains that the imperial forces have drawn back from the region as he was busy fighting them in Pandora. He adds he’ll be returning to his home country of Tasnica to see what he can do to stop the Empire and urges the protagonists to continue their mission by heading to the Upperland with the help of the nearby Cannon Travel center. Sage Luka adds to seek out the wisdom of Sage Joch living atop the Lofty Mountains.
Following Jema’s advice, the party made their way to the Upperland by taking a cannon and landed right in middle of the Forest of Seasons, hitting Popoi’s head in the process. This caused them to lose some its memory they had retrieved prior in the Underground Palace, forcing the party to further explore the premises. They met with a strange flock of bear-like creature called Moogles who claimed, according to the sprite, that they village has been invaded by Pebblers. The party decides to investigate the area, soon finding the aforementioned place swarming with the spiky moles. They quickly get rid of them, allowing the Moogles to take back their turf. Talking to one of them triggers a headache to Popoi, who suddenly remembers everything again. The creature reveals the secret to finding the hidden Sprite Village.
The party follows the instructions only to find the settlement to be deserted. A piercing cry echoes from afar, leading up to an overgrown fowl rampaging in the area. The giant bird is easily defeated and the party find a small temple behind the village. There, they find Popoi’s Grandpa who explains the recent attack from the Empire decimated the village’s population and made him lose his sight. The fact he laid low in the palace made him the sole survivor. He adds the sprites like him and Popoi are dependent of the Mana flow and should the imperial forces release the seals on each Mana seed, the ancient beast will be released once again. If that happens, sprites wille disappear from the face of the world. Popoi swears to protect the seals and take the wind elemental along with them not before his elder advises the party to seek the aid of the white dragon in a cave not too far from here.

Using a wind spell on a nearby orb in the Great Forest allow the adventurers to make their way into uncharted territory, where they stumble on a mushboom village called Matango. There, they meet with King Truffle inside Fung Castle who immediately recognizes Randi as the legendary hero. According to a legend, a mighty hero would wield the hold blade riding a white dragon and save the world. He then adds one of his folk saw a white dragon fighting a huge snake inside the cave up north. The king promises to share the next palace location should the party bring the dragon unscathed here in the castle. On that note, the protagonists make their way up to the northern cave to find the elusive creature. They find the lone dragon after killing off a viper who probably defeated its parents. The party asks Truffle for help carrying it all the way to the castle. There, the king thanks the heroes for rescuing the creature and decides to call it “Flammie”. The young dragon shall stay at his side while the adventurers are directed to Kakkara Desert where the next palace is said to be.

The trio takes the nearest Cannon travel center who blasts them in the middle of the desert. They find a Sandship after some wandering, but are immediately taken for imperial spies and are separated from each other. As each of them is forced to repay their debt for being rescued, they are dispatched around the ship to do manual work. Randi is taken down the engine room and meets with a fellow worker named Sergo, claiming he’s a pirate. He offers to make a diversion to distract the guards while the boy tries to reunites with his friends. The operation is successful, leading Randi to explore the vessel. He then finds Popoi rummaging the kitchen. An old man complains they ate all food in the hold. Randi and Popoi teams up to find Primm in the captain’s quarters, with Commander Morie ordering her to massage his back. She refuses, exchanging some banter with him, but Admiral Meria storms in and starts scolding his grandson for his rude behavior. The older general tries to capture the adventurers, but are interrupted by a surprise imperial assault led by Geshtar. The imperial knight hops on his mechanical hover bike and engage the party into a fight. He is forced to retreat in the end, leading the whole sandship crew to be stranded in the desert. Meria apologizes for his actions upon learning the party’s conection with Jema, and a soldier help them find their way to the town of Kakkara.

There, they learn from the ruler that the local oasis has run dry because of the disappearance of the fire seed from the nearby palace. The town’s minister also adds that the elemental spirit Salamando has also been kidnapped. The party finds a Cannon travel center next to the settlement and head to the frozen wasteland of the north to investigate. They land in Todo Village where a local Walrusker talks about a [[Tropics|tropical paradise hidden deep within the Crystal Forest. While searching the frozen woods, they stumble upon a lone shack with a talking reindeer pleading the party to get his master back from the Ice Palace. After further exploring, they find a warm settlement devoid of snow and ice in the middle of the frigid plains. In the middle of this peculiar place lies a large heater, holding none other than the fire mana spirit inside. They free the creature, which immediately joins the team, making the whole area freeze. Turns out the Scorpion Army was behind all this and stole the elemental to attract rich tourists. One of the lackeys blurts out that they saw an old man grabbing the seed while they nabbed Salamando back at the Fire Palace. This gives the party the incentive to explore the Ice Palace lurking at the end of the forest. Inside, they are greeted by an ice giant who is revealed to be none other than Santa Claus. He fell for the Mana Seed’s power once he sought to make children believe in him again, and transformed into this hideous gigas instead. He gives the Mana Seed back to the protagonists who return to the desert to put it on the fire altar.

This feat did not bring water back to Kakkara, however, and the protagonists press on toward their next destination by taking the cannon aiming to another continent. They arrive in enemy’s territory in a place called Southtown, where they meet an old tasnican undercover agent who gives the party the secret password to the sewer connecting Southtown to Northtown. There, they encounter the Resistance a group of young spies trained to defeat the Empire. Their leader is the young lady called Krissie]] who claims a man named Dyluck has recently stationed himself in the eastern ruins to steal people’s energy. They decide to investigate here, and find Pamaela speaking about marrying Dyluck, deeply upsetting Primm, who knocks her out. Krissie brings her to the local doctor while the party enters the old ruins. The party encounters Dyluck in the deepest part of the ruins, and he tricks Primm by stealing her energy. This betrayal angers Randi, who hits the soldier with his weapon. This momentarily snaps the possessed man out, telling Randi & Popoi to save her beloved friend located in the back room. The lady is found unconscious next to Thanatos who immediately paralyzes the two adventurers upon sight. His plans are thwarted, however, when Dyluck decides to transfer some of his life force the party, resurrecting Primm and freeing Randi and Popoi. The mystic knight retreats, leaving his underling Vampire to deal with them. The party defeats the creature, but do not make it in time enough to save Dyluck.

With nowhere else to go, the protagonists return to the Resistance headquarters and tell Krissie what has happened. She then informs the Emperor claims he wants a truce and disbands the imperial army, but the Resistance is highly skeptical of his true motives. They still agree to come to Vandole’s meeting in the Imperial Palace, but it is quickly revealed to be a trap. The party is put to jail along with the entire Resistance, and a destined to be mauled by powerful mechanical bioweapons. The adventurers fortunately escape and try to settle their argument with the Emperor. As they storm the throne room, they are greeted with Vandole surrounded by three of his four imperial generals: Geshtar, Sheex, and Fanha. Geshtar pleads the Emperor for a rematch, and fights the trio atop the palace while the others escape. He is killed off by them, but not before the mechanical genius burns the whole place to the ground. The party is saved in the nick of time by King Truffle riding a fully grown Flammie. He gives its favorite toy drum to the party, saying they can call him anytime, then escape the palace by flying toward Matango. Truffle directs them to the Lofty Mountains, where Sage Joch awaits.

The protagonists head there and climb the tallest peak to where the wizened old man is said to live. Inside a cave, they only find a strange humanoid bird telling them His Sageness went to the Palace of Darkness. The adventurers headed into the temple, synchronized the Mana Sword with its Mana seed, and befriended its elemental Shade. Upon heading back to the hermit’s cave, they learn Sage Joch went to Gold Isle. The party has no other choice but to comply and head for the aforementioned place. There, they learn about the ruler of the isle King Mammon has used the Wisp light elemental’s power to turn its city into gold, and locked it inside Gold Tower. The key to the tower was stolen by a Tasnican spy. It turns out the spy was Mara’s late husband and she’s been keeping it safe inside a box as a memento. She gives the key to the party and they return to the Light Tower to investigate. They rescue Lumina at the top of the structure and fuse the Mana Seed with the Holy Blade. Upon returning to Sage Joch, his pupil claims he is gone yet again, this time exploring the Moon Palace near Kakkara Desert. After flying to the aforementioned location, they meet with a friendly Robin Foot monster named Karon who let them cross the Sea of Wonder with his ferry. There, they go inside the palace with Luna the Moon elemental awaiting them. Randi draws out his blade once again before the Mana Seed before heading back to the Lofty Mountains. To no one’s surprise, Jehk discloses yet another location his master has gone to and the trio has no other choice but to go there as well.

They arrive as the Lemlian Castle of the Tasnican republic following Jehk’s instructions, where they learn form Jema about an imperial spy hiding amidst the castle. He is out for the chancellor according to the old knight, pleading the protagonists to stay alert. After searching the castle through and through, they finally enter the audience room to meet with the chancellor. To their utter shock, he frames them as imperial spies and tries to arrest them on the spot. Jema erupts into the scene, claiming the chancellor is a fake since he doesn’t cast any shadow, foiling the usurper’s plans. He reveals himself to be Sheex in disguise and attack the party, but they are no match for him and he is forced to retreat. The true chancellor thanks the adventurers for saving the republic and Jema instructs them to go learn true courage from Sage Joch before the Empire becomes unstoppable.
Back atop the Lofty Mountains, the party finally meet the old sage, who shall declare them worthy should they succeed in overcoming his Passage of Trials. The party accepts the challenge and the way opens next to them. They defeat the monsters on their way to the end one by one, until they come face to face with their final task: defeating their doppelgangers. They manage to do so, and return to the cave’s entrance with Sage Joch nowhere to be found. The mischievous bird is revealed to be the true Joch, as the old man was merely an illusion, stating he has been waiting for them to find their inner strength before unveiling the truth. He then directs them to the Sunken Continent where the last palace is said to be as well as the last remnants of the Mana Fortress.

The trio calls Flammie and fly to the deserted island, but is cornered by Emperor Vandole and his crew as they enter the temple. He declares the last seal to remain here, having visited all previous palaces to undo them behind the heroes’ back. He flees to the last altar with Fanha, leaving Sheex to transform into his mavolian form to take care of them. The general is eventually defeated, but the seal is broken before they could do anything. The party nabs the last elemental and escape the raising continent by calling the white dragon. Fearing the worst, they go back to Water Palace only to find Luka behind bars. She claims the imperials army unsealed the Water Seed and put her in jail. The then adds that the seal cannot be restored with the Mana Sword anymore and her last resort is now to pray for a miracle.

Back on the emerged continent, the party finds the areas swarming with monsters, with the Tasnican forces amidst the brawl. Jema is among them, telling the heroes that troops around the world are fighting to stop the Empire from resurrecting the fortress. He tells them to go underground and make their way to the palace there. The party accepts and ventures into the bowels of the earth to chase after Emperor Vandole. They are stalled on the way by the Scorpion Army, now seeking to grab the Mana Sword by force. They activate their new & improved robot, but are defeated once again. After a never-ending trek around the Underground City, they finally reach the altar room where they find a dead Vandole to their bewilderment. They quickly learn that it was Fanha who betrayed the Emperor, gloating about controlling the Mana Fortress and soon the world itself together with Thanatos. The mystic knight discloses that Dyluck’s body is needed for his transfer ritual, and escape to the fortress while Fanha transforms into her serpentine alter ego to confront the party. She perishes along with Geshtar, who was revived by Thanatos to stall the heroes even further.

They escape the structure right as the Mana Fortress is about to lift off. As they land on the resubmerged island, they speak with Jema, who is deeply distraught at the idea of not having prevented the resurrection of the fortress. He then recalls of a distant land hosting the Mana Tree. The thick fog surrounding it has recently subsided due to the fortress consuming Mana at an alarming rate. Should Randi synchronizes the Mana Sword with the Sacred Tree, he should be able to bring the blade back to its full power. The party looks around the island before departing and finds Primm’s best friend Pamaela inside the palace. She deeply regrets behaving the way she did prior, but Primm comforts her, saying she was under the Thanatos’s spell. Pamaela reveals that she was jealous of Dyluck and her being an item and that was how the evil sorcerer was able to manipulate her so easily. The two friends make amends and the party heads to the hallowed sanctuary.

Upon landing there, they hear a mysterious voice telling them to come hither. The heroes hack through the thick greenery and destroy many fearsome beasts to finally pinpoint the Mana Tree in the distance. Their rejoice is short-lived, however, as they see the Mana Fortress firing a missile at the Tree. The party awakes before the destroyed Mana Tree, telling Randi she has been awaiting his arrival. She tells them that the resurrection of the fortress has used up most of the world’s Mana, meaning that soon all the Mana beasts of this land will coalesce into one humongous creature, bringing Mana back to the planet. However, the recent decrease in Mana will cause the Mana Beast to enter an unbridled frenzy, destroying the world. The only way to prevent this is to defeat the beast with the Mana Sword. Randi is the last surviving member of the Mana Clan able to do this as the Mana Tree reveals she and the legendary tasnican knight Serin are his parents. He once challenged the Empire fifteen years ago, but was left badly wounded. With the last of its strength, he journeyed to Potos to retrieve the Mana Sword but never made it in time. She transformed into the Mana Tree afterwards to protect the world from evil. The Mana Tree bids her son farewell, then reseals the eight Mana Seeds of the world into the Holy blade before dying. Primm & Popoi are supportive of his loss, telling Randi not to give up as they got him covered.

After making last-moment preparations, they fly toward the ominous fortress for the final battle. They traverse the mechanical maze laid out in front of them, leading all the way to some familiar faces. The evil sorcerer reveals that his own body has reached its limit and needs another worthy vessel to house his spirit. As he couldn't take a normal human because his earthly envelope would tear apart, he went on a search for a human born in the shadow of darkness every few decades. It happens that Dyluck's body is one of them and is capable of augmenting his powers beyond comprehension. While the young soldier's powers were sealed as a child, he is no more than a puppet to Thanatos now and will be housing his evil soul and using the Mana Fortress to rule the world. The magic knight is suddently growing weaker by the minute and must now inhabit his new vessel before collapsing. Primm then lunges towards Dyluck as a way to prevent his possession going further attacking the evildoer in the process. The latter's body vanishes almost instantly but unfortunately, Thanatos's soul has become one with the major's body. Gloating about his newfound vessel, the possessed Dyluck tries to further his modus operandi, but suddently finds himself unable to do anything. An otherworldly but familiar voice resonates across the room, telling Primm to listen to it as it is Dyluck's spirit. His echo says that he cannot speak for too long since Thanatos's energy is too strong, but he knows a way to defeat the sorcerer. He reveals to the party that Thanatos was once an ancient sorcerer who sold his soul to Maviola in exchange for eternal life. While his spirit became eternal, his body slowly decayed and he must periodically find a new suitable host to possess. With each new body, his spirit grows ever darker as it feeds on hatred and destruction. Dyluck's spirit then apologizes to Primm, as he cannot join her in the mortal realm anymore and entrust Randi to take care of her. As he finishes his speech, Dyluck uses his last bit of strength to destroy his body, leaving Thanatos without a host and revealing his true face. Desperate to find a new host, the dark entity heads for the heroes in vain as he is eventually defeated.

His death triggers the emergence of the Mana Beast, forcing the heroes to head at the top of the fortress to confront it. Randi is afraid, however, that Popoi would disappear along with Mana should they slay the creature. The sprite retaliates by stating that the world of sprites and elementals are separate from the human world, meaning that they will just not see Randi and Primm again. According to them, the fate of the world is much more pressing than sprites, so they better take care of the Mana Beast quickly since Randi promised his mother to do so. The three of them advance toward the towering being, with Popoi and Primm casting Mana Magic to fill the Holy Blade with power. A grueling and arduous battler ensues, eventually making the party victorious as the Mana Beast vanishes into snow.
With Mana disappearing, Popoi is no more, leaving Randi & Primm to mourn over they sprite friend. They swear before each other to never forget them, and return to previous locations to visit their acquaintances form all over the world. Randi leaves Primm to her father in Pandora before departing to his hometown of Potos, where he is seen putting the Mana Sword back into its original resting place. Popoi’s spirit is seen visiting the Sprite Village, before glancing at the moonlit sky atop a tree.
Gameplay[edit]
Controls[edit]
Overworld[edit]
| Action | Function | SNES |
|---|---|---|
| Move | Move in the four cardinal directions. Pressing two directions close to each other at once will make the player character move in diagonals. | |
| Dash | Dash in a straight line, depletes your Power Meter. | (Hold) |
| Attack/Interact | Strike with your weapon in areas with enemies. Also makes your character interact with an NPC or a sign if in range. | |
| Charge | Charges up your Power Meter to execute a Power Attack, making the character move slower. | (Hold) |
| Activate/deactivate character | If a second or third controller (Multi-Player Adapter required on SNES) is recognized by the system, pressing start on the respective controller with allow the second or third player to control a character. | |
| Switch character | Switch between playable characters. | |
| Strafing | Make your character face the same direction as an enemy while charging its weapon. | (Hold) |
Menus[edit]
| Action | Function | SNES |
|---|---|---|
| Open/close controlled character ring command | Make the currently controlled character Ring Command open or close. Switches to the currently controlled character Ring Command if on an ally's. | |
| Open/close ally character ring command | Make an ally character Ring Command open or close. Switches to an ally character Ring Command if on the main controlled character's. | |
| Move | Move left or right in the currently viewed Ring Command. | (left or right) |
| Switch ring commands | Move up and down to switch to another Ring Command. | (up or down) |
| Select item command | Press once in item Ring Command to select which character to consume the item with the hand cursor. Press twice to confirm. | |
| Select weapon command | Press once in weapon Ring Command to make selected weapon flicker. Press twice on same weapon to equip, or on another weapon to swap. | |
| Select magic command | Press once in magic Ring Command to enter selected elemental spirit sub-menu. Press twice to select magic spell with hand cursor and a third time to confirm. |
Merchant Rings[edit]
| Action | Function | SNES |
|---|---|---|
| Move | Move left or right in the Merchant Ring Command. | |
| Select item/armor | Press once in Merchant Ring Command to make slected purchase/sell flicker. Press twice to confirm purchase/sell. | |
| Cancel | Cancel selected purchase/sell. Go back to a previous menu or stop interaction with shopkeeper. |
Ring Commands[edit]
Secret of Mana introduces the Ring Commands to the series as various menu functions throughout the game. There four main ring commands tied to each playable characters.
- Item Rings allow the player to view and use currently owned items.
- Weapon Rings allow the player to view and equip currently owned weapons.
- Edit Rings display information about weapons & armor, character status, window edit, etc.
- Magic Rings are exclusive to Primm and Popoi. They are used to cast magic spells.
Item Ring Command[edit]
This Ring Command display all currently hold items. There is a maximum of 10 item varieties, each consumable items can hold up to four units.
Weapon Ring Command[edit]
All eight weapons found throughout the aventure are displayed here. Currently equipped weapons are marked with a miniature icon of each player character. An upper window informs about the currently selected weapon's name and attack power (right) compared to the character ring's equipped weapon (left). Players can switch equipped weapons to another by selecting one with the cursor and pressing ![]() .
.
Edit Ring Command[edit]
This Ring Command has seven sub-menus to explore. Here the player can get information about various game components and even costumize certain gameplay elements.
- Window Edit: This sub-menu allows players to customize message windows in three ways: background color, frame style, and background pattern. Players can use the
 button in any direction to change window frames and background patterns. They can also either press
  ,
,  , or
, or  to customize the background color.
- Targeting
- Controller Edit
- Status
- Weapon/Magic Level
- Action Grid
- Equip Armor
Items[edit]
| Item | Artwork | Type | Effect | Description | Cost | Neko's | Sell |
|---|---|---|---|---|---|---|---|
Candy |

|
Consumable | Recover 100 HP to one ally. | It's a small, clear, round drop. You regain energy when you eat it and recover about 100 HP. | 10 | 20 | 6 |
Chocolate |

|
Consumable | Recover 300 HP to one ally. | More than just a round drop, this chocolate has some teeth to it. It heals about 300 HP. It's a chocolate with recovery power. | 30 | 60 | 20 |
Royal Jam |

|
Consumable | Recover full HP to one ally. | A very precious golden jelly. A sip of this liquid will completely restore your HP. | 100 | 200 | 66 |
Medical Herb |

|
Consumable | Heal status ailments. | A heart-shaped medicinal herb. If you drink a decoction of this herb, it will cause all the status abnormalities except for the reaper's status to be removed instantly. | 10 | 20 | 6 |
Cup of Wishes |

|
Consumable | Revive a ghosted player. | The holy power of angels is poured in this chalice. The Reaper can be driven away by raising it. | 150 | 300 | 100 |
Barrel |

|
Consumable | Player becomes invulnerable from physical and magical attacks but cannot run nor attack. | ? | N/A | 900 | 300 |
Magic Rope |

|
Key item | Teleport to the dungeon's entrance. | A rope with a will of its own. You can teleport away by holding on to it. | N/A | N/A | N/A |
Flammie Drum |

|
Key item | Summons Flammie. | You can call Flammie with this drum and fly to different places. | N/A | N/A | N/A |
Moogle Belt |

|
Key item | Transform into and restore moogled player. | This rare item holds the power of the Moogles. You can transform into a Moogle but wearing it. | N/A | N/A | N/A |
Midge Mallet |

|
Key item | Transform into and restore pygmized player. | This rare item holds magical powers. You can transform someone in little people by hitting them. | N/A | N/A | N/A |
Weapons[edit]
| The sword can be used to cut grass and shrubs. | |||||||
|---|---|---|---|---|---|---|---|
| Swords | Artwork | Attack Power | Weapon Charge | Effect | Description | Location | Forge cost |
Rusty Sword |

|
3 | 1 | ジャンプ斬り | N/A | The blade on this sacred sword is rusted. | Found in a rock in Potos Falls. | N/A |
Broad Sword |

|
8 | 2 | 頭上回し斬り | Raise Agility/Evade %. | Sword with a ten finger quillon. A slender sword for both offense and defense. | Sword's orb won from defeating Mantis Ant. | 200 |
Herald Sword |

|
14 | 3 | 3 段斬り | Effective against amorphous/reptiles. | Despite its old-fashioned blade, the sword has a sharp cutting edge. | Found in a treasure chest in Pandora Castle after defeating Wall Face in Pandora Ruins. | 400 |
Claymore |

|
20 | 4 | 前後逆波斬り | Effective against insects. | A sword that can easily slice through even hard objects such as shells. | Sword's orb won from defeating Great Viper in Cave of the White Dragon. | 800 |
Excalibur |

|
27 | 5 | ? | Effective against Demon/Spirit enemies. | ? | Treasure chest in Northtown Ruins. | 1,600 |
Masamune |

|
35 | 6 | ? | Raises % of critical hits. | ? | Reward from King from defeating Dark Stalker in Republic of Tasnica. | 3,000 |
Gigas Sword |

|
44 | 7 | ? | Increases Strength by 2 points. | ? | Treasure chest in Mana Palace | 6,500 |
Dragon Buster |

|
52 | 8 | ? | Effective against dragons. | ? | Sword's orb won after defeating Thunder Gigas in Pure Land. | 12,500 |
Mana Sword |

|
65 | N/A | The top sword. | ? | Unlocked by casting Primm and Popoi's mana magic during Mana Beast's fight in Mana Fortress. | N/A |
| The spear has no overworld use. | |||||||
|---|---|---|---|---|---|---|---|
| Swords | Artwork | Attack Power | Weapon Charge | Effect | Description | Location | Forge cost |
Spear |

|
4 | 1 | 横車輪突き | N/A | A simple, slender spear with a handle and blade cast in one piece. | Given by Luka in Water Palace. | N/A |
Heavy Spear |

|
11 | 2 | 頭上回し連続 2 回突き | N/A | The steel used in this spear increases strength and power. | Spear's orb won from defeating Tropicallo in Dwarf Village. | 200 |
Sprite's Spear |
16 | 3 | 横車輪3 段突き | Balloons enemy. | Thrusting and striking poleaxe that can also cut. | Found in a treasure chest in Pandora Castle after defeating Wall Face in Pandora Ruins. | 400 | |
Partisan |

|
23 | 4 | 狂乱 4 段突き | Effective against amorphous/reptiles. | Especially effective against indeterminate and reptiles monster types. | Found in a treasure chest in Santa's House. | 800 |
Halberd |

|
29 | 5 | ? | Confuses enemy. | ? | Found in a treasure chest in Northern Ruins. | 1,600 |
Oceanid Spear |

|
38 | 6 | ? | Puts enemy to sleep. | ? | Found in a treasure chest in Gold Tower. | 3,000 |
Gigas Lance |

|
47 | 7 | ? | Increases Strength by 2 points. | ? | Spear's orb won from defeating Aegagroplion in Mana Palace. | 6,500 |
Dragon Lance |

|
54 | 8 | ? | Effective against dragons. | ? | Spear's orb from defeating Mech Rider #3 in Mana Fortress. | 12,500 |
Daedalus Lance |
N/A | 56 | N/A | The top spear. | ? | Item Drop from Tsunamis in Mana Fortress. | 25,000 |
| The knuckles have no overworld use. | |||||||
|---|---|---|---|---|---|---|---|
| Knuckles | Artwork | Attack Power | Weapon Charge | Effect | Description | Location | Forge cost |
Spike Knuckle |

|
2 | 1 | フック・フック・ストレート | N/A | A simple four-fingered weapon for fighting. | Primm's starting weapon. | N/A |
Power Glove |

|
6 | 2 | 連続ストレート・アッパー | Inflicts damage on insects. | A leather glove with a sharp metal iron on the striking area. | Glove's orb won from defeating Biting Lizard in Undine's Cave. | 200 |
Moogle Claw |

|
11 | 3 | 連続技+後ろ回し蹴り | Puts enemy to sleep. | Gloves with the effect on sleep from its three long claws. | Given by Jema after defeating Jabberwocky in Water Palace. | 400 |
Chakra Hand |

|
17 | 4 | 連続技+前後ローリングアタック | Raises Intelligence/Wisdom. | A mystical ring that affects the intellect and spirituality. | Found in a treasure chest in Ice Palace. | 800 |
Heavy Glove |

|
24 | 5 | ? | Inflicts damage on insects. | ? | Glove's orb won from defeating Metal Mantis in Imperial Palace. | 1,600 |
Hyper-Fist |

|
29 | 6 | ? | Effective against amorphous/reptiles. | ? | Found in a treasure chest in Palace of Darkness. | 3,000 |
Griffin Claws |

|
38 | 7 | ? | Poisons enemy. | ? | Glove's orb won after defeating Red Dragon in Pure Land. | 6,500 |
Dragon Claws |

|
47 | 8 | ? | Effective against dragons. | ? | Item Drop from Wolf Lords in Mana Fortress. | 12,500 |
Aura Glove |
N/A | 56 | N/A | The top glove. | ? | Item Drop from Wolf Lords in Mana Fortress. | 25,000 |
| The boomerang has no overworld use. | |||||||
|---|---|---|---|---|---|---|---|
| Boomerangs | Artwork | Attack Power | Weapon Charge | Effect | Description | Location | Forge cost |
Boomerang |

|
2 | 1 | 2回弓横段り・連続小跳躍下突き | N/A | A very common wooden boomerang in the shape of the letter "H". | Popoi's starting weapon. | N/A |
Chakram |

|
6 | 2 | 2 回構殴り・ためて縦振り | Effective against amorphous/reptiles. | Thin wooden board with metal blades on all four sides. | Boomerang's orb won from defeating Spikey Tiger in Witch's Castle. | 200 |
Lode Boomerang |

|
12 | 3 | 2 回横段り・大波縦横斬り | Slows enemy down. | Fairly heavy iron boomerang with great destructive power. | Boomerang's orb won from defeating Spring Beak in Sprite Village. | 400 |
Rising Sun |

|
17 | 4 | 2 回横段り・小跳躍下突き | N/A | A donut-shaped disk with a razor-sharp outer edge. | Boomerang's orb won from defeating Frost Gigas in Ice Palace. | 800 |
Red Cleaver |

|
24 | 5 | ? | Inflicts damage on insects. | ? | Boomerang's orb won from defeating Vampire in Northtown Ruins. | 1,600 |
Cobra Shuttle |

|
30 | 6 | ? | Poisons enemy. | ? | Boomerang's orb won after defeating Blue Spike in Gold Tower. | 3,000 |
Frizbar |

|
38 | 7 | ? | Effective against amorphous/reptiles. | ? | Found in a treasure chest in Underground City. | 6,500 |
Shuriken |

|
47 | 8 | ? | Raises % of critical hits. | ? | Boomerang's orb won after defeating Blue Dragon in Pure Land. | 12,000 |
Ninja's Trump |
N/A | 53 | N/A | The top boomerang. | ? | Item Drom from Master Ninjas in Mana Fortress. | 12,000 |
| The bow has no overworld use. | |||||||
|---|---|---|---|---|---|---|---|
| Swords | Artwork | Attack Power | Weapon Charge | Effect | Description | Location | Forge cost |
Chobin's Bow |

|
3 | 1 | 2回弓横段り・弓線振り | N/A | Not as powerful, but for what it is, it's a small, easy-to-handle bow. | Given by Dwarf Elder in Dwarf Village. | N/A |
Short Bow |
File:Short Bow SOM artwork.png | 8 | 2 | 2回弓横段り・2回弓縦振り | N/A | The bow and arrow are made by layering metal plates to increase its power. | Bow's orb won after defeating Wall Face in Pandora Ruins. | 200 |
Long Bow |
File:Long Bow SOM artwork.png | 12 | 3 | 2回弓横段り・小跳躍下突き | Effective against animals/birds/beasts. | It is a very effective bow for hunting animals, birds, and beasts. | Bow's orb won after defeating Jabberwocky in Water Palace. | 400 |
Great Bow |
File:Great Bow SOM artwork.png | 20 | 4 | 2回弓横段り・連続小跳躍下突き | Confuses enemy. | Trigger type bow and arrow that uses strong tension to shoot through enemies. | Bow's orb won after defeating Boreal Face in Frozen Forest. | 800 |
Bow of Hope |
File:Bow of Hope SOM artwork.png | 27 | 5 | ? | Effective on Demon/Spirit enemies. | ? | Found in a treasure chest in Northtown Ruins. | 1,600 |
Elfin Bow |
File:Elfin Bow SOM artwork.png | 35 | 6 | ? | Raises Intelligence/Wisdom. | ? | Bow's orb won after defeating Gorgon Bull in Gold Tower. | 3,000 |
Wing Bow |
File:Wing Bow SOM artwork.png | 43 | 7 | ? | Raises Intelligence/Wisdom. | ? | Bow's orb won after defeating Kettle Kin in Underground City. | 6,500 |
Doom Bow |
File:Doom Bow SOM artwork.png | 52 | 8 | ? | Raises % of critical hits. | ? | Bow's orb won after defeating Snow Dragon in Pure Land. | 12,500 |
Garuda Buster |
N/A | 54 | N/A | The top bow. | ? | Item drom from Metal Crabs in Mana Fortress. | 25,000 |
| The axe can be used to destroy rocks and other sturdy obstacles. | |||||||
|---|---|---|---|---|---|---|---|
| Axes | Artwork | Attack Power | Weapon Charge | Effect | Description | Location | Forge cost |
Watt's Axe |

|
4 | 1 | ため斬り | N/A | A primitive axe with a wooden handle and metal blade attached. | Sold for 100 GP by Watts in Dwarf Village. | N/A |
Lode Axe |

|
11 | 2 | 十文字斬り | Effective against plants/fish. | Traditional and easy to use battle axe. | Axe's orb won from defeating Fire Gigas in Underground Palace. | 200 |
Stout Axe |

|
16 | 3 | 3 段斬り | Increase Constitution by 2 points. | A two-bladed axe that can be swung left and right. | Found in a treasure chest in Moogle Village. | 400 |
Battle Axe |

|
23 | 4 | 前後津波斬り | Effective against plants/fish. | An axe effective against plants and fish monsters. | Found in a treasure chest in Fire Palace. | 800 |
Golden Axe |

|
29 | 5 | ? | Inflicts damage on insects. | ? | Found in a treasure chest in Imperial Palace. | 1,600 |
Were-buster |

|
38 | 6 | ? | Inflicts damage on insects. | ? | Found in a treasure chest in Gold Tower. | 3,000 |
Great Axe |

|
46 | 7 | ? | Inflicts damage on insects. | ? | Axe's orb won from defeating Dragon Worm in Pure Land. | 6,500 |
Gigas Axe |

|
56 | 8 | ? | Increases Strength by 5 points. | ? | Item Drop from Fiend Heads in Mana Fortress. | 12,500 |
Doom Axe |
N/A | 59 | N/A | The top axe. | ? | Item Drop from Fiend Heads in Mana Fortress. | 25,000 |
| The whip can be used to latch onto poles and cross gaps. | |||||||
|---|---|---|---|---|---|---|---|
| Whips | Artwork | Attack Power | Weapon Charge | Effect | Description | Location | Forge cost |
Whip |

|
2 | 1 | 3 回横突き | N/A | A whip made of supple, tanned leather made of monster hide. | Found in a treasure chest after defeating Spikey Tiger in Witch's Castle. | N/A |
Black Whip |

|
6 | 2 | 横車輪ため突き | Slows enemy down. | A heavyweight, double-lashed whip that rips the enemy to shreds. | Found in a treasure chest in Thieves' Ship. | 200 |
Backhand Whip |

|
12 | 3 | 頭上回し突き | Raise Agility/Evade %. | Whip that strikes down the enemy with the swiftness of the wind. | Found in a treasure chest in Moogle Village. | 400 |
Chain Whip |

|
17 | 4 | 回転振り回し突き | Effective against amorphous/reptiles. | A striking weapon with a handle and iron ball connected by a chain. | Whip's orb won after defeating Mech Rider in Kakkara Desert. | 800 |
Flail of Hope |

|
24 | 5 | ? | Effective on Demon/Spirits enemies. | ? | Whip's orb won after defeating Doom's Wall in Northtown Ruins. | 1,600 |
Morning Star |

|
30 | 6 | ? | Inflicts damage on insects. | ? | Found in a treasure chest in Imperial Palace. | 3,000 |
Hammer Flail |

|
38 | 7 | ? | Slows enemy down. | ? | Whip's orb won after defeating Hexas in Mana Palace. | 6,500 |
Nimbus Chain |

|
47 | 8 | ? | Inflicts damage on insects. | ? | Whip's orb won after defeating Hexas in Mana Palace. | 12,500 |
Gigas Flail |
N/A | 53 | N/A | The top whip. | ? | Item drop from Terminators in Mana Fortress. | 25,000 |
| The javelin has no overworld use. | |||||||
|---|---|---|---|---|---|---|---|
| Javelins | Artwork | Attack Power | Weapon Charge | Effect | Description | Location | Forge cost |
Pole Dart |

|
2 | 1 | 2回棒横段り • 片手横突き | N/A | Has a short handle and Easy to use for beginners. | Given by Undine in Undine's Cave. | N/A |
Javelin |

|
6 | 2 | 2回神横殴り • 2回片手横突き | N/A | The tip of the bridge is sharp and pointy. | Javelin's orb won from defeating Kilroy in Thieves' Ship. | 200 |
Light Trident |

|
12 | 3 | 2回神横殴り • 小跳躍下突き | Effective against animals/birds/beasts. | It is powerful against beasts and birds. Throw away to demonstrate power. | Found in a treasure chest in Fung Castle. | 400 |
Lode Javelin |

|
17 | 4 | 2回神横段り• 連続小跳躍突き | Balloons enemy. | A thick, heavy javelin with a three-pronged tip and strong breaking power. | Javelin's Orb won after defeating Minotaur in Gold Tower. | 800 |
Fork of Hope |

|
24 | 5 | ? | Effective on Demon/Spirit enemies. | N/A | Javelin's Orb won after defeating Mech Rider #2 in Imperial Palace. | 1,600 |
Imp's Fork |

|
30 | 6 | ? | Balloons enemy. | N/A | Javelin's Orb won after defeating Lime Slime in Palace of Darkness. | 3,000 |
Elf's Harpoon |

|
38 | 7 | ? | Raises Intelligence/Wisdom. | N/A | Javelin's Orb won after defeating Snap Dragon in Mana Palace. | 6,500 |
Dragon Dart |

|
47 | 8 | ? | Effective against dragons. | N/A | Javelin's Orb won after defeating Axe Beak in Pure Land. | 12,500 |
Valkyrian |
N/A | 53 | N/A | The top javelin. | N/A | Item Drop from Whimpers in Mana Fortress. | 25,000 |
Armor[edit]
| Headgear | Artwork | Equipable by | Defense Power | Magic Defense Power | Effect | Description | Location | Buy | Sell |
|---|---|---|---|---|---|---|---|---|---|
Bandanna |

|
2 | 2 | N/A | Cloth armor that wraps around the head. Protective gear. It is inexpensive, but minimal protection is better than nothing. | Potos Village, Neko's | 50 | 32 | |
Hair Ribbon |

|
3 | 3 | N/A | Ribbon used to tie up hair. It looks beautiful, but not much protection can be expected. | Pandora, Kippo Village, Neko's | 55 | 36 | |
Rabite Cap |

|
5 | 5 | N/A | A hat that was made to resemble a rabite monster. It is a protective gear for children that can completely cover their heads. | Dwarf Village, Neko's | 45 | 30 | |
Head Gear |

|
7 | 7 | N/A | Leather head protector often used by martial artists. It is strong, lightwright and offers good protection. | Dwarf Village, Pandora, Forest of Seasons, Neko's, Item Drop from Kid Goblins. | 70 | 46 | |
Quill Cap |

|
10 | 10 | N/A | A lightweight hat with a large feather ornament coveted by hunters. The feather is imbued with magic. | Forest of Seasons, Fung Castle, Neko's, Item Drop from Nemesis Owls. | 110 | 72 | |
Steel Cap |

|
13 | 13 | N/A | An helmet made of fused laminated steel. It has no ornamentation, but it is the most popular armor for warriors. | Fung Castle. | 180 | 120 | |
Golden Tiara |

|
17 | 17 | N/A | A hair ornament made of gold. Its noble light has a mysterious power to keep demons at bay. | Kakkara, Todo Village, Neko's Crystal Forest Branch, Southtown. | 350 | 232 | |
Raccoon Cap |

|
21 | 21 | N/A | ? | Kakkara, Todo Village, Neko's Crystal Forest Branch, Southtown. | 550 | 366 | |
Quilted Hood |

|
26 | 26 | Agility +5, Hit% +2% | ? | Southtown, Northtown. | 700 | 466 | |
Tiger Cap |

|
32 | 32 | N/A | ? | Northtown. | 1,100 | 732 | |
Circlet |

|
38 | 38 | Agility +5, Hit% +2% | ? | Southtown, Northtown. | 2,300 | 1,532 | |
Unicorn Helm |

|
55 | 55 | N/A | ? | Gold City. | 5,625 | 3,750 | |
Dragon Helm |

|
66 | 66 | N/A | ? | Tasnica, Gold City. | 7,500 | 5,000 | |
Duck Helm |

|
78 | 78 | N/A | ? | Tasnica, Gold City. | 11,250 | 7,500 | |
Needle Helm |

|
140 | 140 | N/A | ? | Mana Palace, Item Drop from Needlions. | 30,000 | 10,000 | |
Cockatrice Cap |

|
142 | 143 | Prevents pretrification. | ? | Item Drop from Basilisks. | N/A | 15,000 | |
Amulet Helm |
File:Amulet Helm SOM artwork.png | 143 | 142 | +5 Intelligence. | ? | Item Drop from National Scars. | N/A | 24,000 | |
Griffin Helm |

|
145 | 145 | +5 Strength, +5 Agility. | ? | Item Drop from National Scars. | N/A | 29,666 | |
Faerie Crown |

|
150 | 150 | +5 Intelligence. | ? | Item Drop from Terminators. | N/A | 38,666 |
| Body armor | Artwork | Equipable by | Defense Power | Magic Defense Power | Effect | Description | Location | Buy | Sell |
|---|---|---|---|---|---|---|---|---|---|
Overalls |

|
3 | 1 | N/A | Made of durable and lightweight animal tanned leather. Very useful at the beggining of the game. | Potos Village. | 20 | 12 | |
Kung Fu Suit |

|
4 | 2 | N/A | A robe worn by masters of a martial art called kung fu. The chest area is adorned with bright embroidery. | Pandora. | 25 | 16 | |
Midge Robe |

|
7 | 4 | N/A | A children's ensemble adorned with a fur hood and a tail. It offers more in its design than its protection. | Dwarf Village. | 22 | 14 | |
Chain Vest |

|
10 | 6 | N/A | This waistcoat is made with small metal rings woven together. While it's heavy, its doesn't provide much defense. | Kippo Village, Dwarf Village. | 120 | 80 | |
Spiky Suit |

|
13 | 8 | N/A | A suit made from leather. It is decorated with chains, belts, metal spikes, etc. | Pandora, Dwarf Village, Forest of Seasons. | 260 | 172 | |
Kung Fu Dress |

|
17 | 10 | N/A | Traditional costume introduced by people from a foreign land. A slim dress with deep cuts on both sides of the hemline. | Pandora, Kippo Village, Forest of Seasons, Item Drop from Werewolves. | 350 | 232 | |
Fancy Overalls |

|
22 | 13 | N/A | Tunic made of satin fabric. It is said that monsters that gaze at this colorful suit make them lose their will to fight. | Fung Castle. | 675 | 450 | |
Chest Guard |

|
28 | 16 | N/A | ? | Kakkara, Todo Village, Neko's Crystal Forest Branch, Southtown. | 1,000 | 666 | |
Golden Vest |

|
34 | 20 | N/A | ? | Kakkara, Todo Village, Neko's Crystal Forest Branch, Southtown. | 2,250 | 1,500 | |
Ruby Vest |

|
43 | 24 | N/A | ? | Southtown, Northtown. | 4,500 | 3,000 | |
Tiger Suit |

|
52 | 29 | N/A | ? | Northtown. | 6,375 | 4,250 | |
Tiger Bikini |

|
64 | 35 | N/A | ? | Northtown. | 7,100 | 4,732 | |
Magical Armor |

|
78 | 41 | N/A | ? | Mandala, Lofty Mountains, Item Drop from Dark Knights. | 11,500 | 7,666 | |
Tortoise Mail |

|
95 | 49 | N/A | ? | Republic of Tasnica. | 14,850 | 9,900 | |
Flower Suit |

|
115 | 57 | N/A | ? | Gold City. | 21,000 | 14,000 | |
Battle Suit |

|
139 | 67 | N/A | ? | Republic of Tasnica, Gold City. | 30,000 | 20,000 | |
Vestguard |

|
240 | 90 | N/A | ? | Mana Palace. | 65,500 | 21,832 | |
Vampire Cape |

|
243 | 93 | N/A | ? | Item Drop from Fiend Heads. | N/A | 31,332 | |
Power Suit |

|
245 | 95 | +5 Strength. | ? | Item Drop from Fiend Heads. | N/A | 31,332 | |
Faerie Cloak |

|
250 | 100 | +5 Constitution. | ? | Item Drop from Fiend Heads. | N/A | 43,332 |
| Accessories | Artwork | Equipable by | Defense Power | Magic Defense Power | Effect | Description | Location | Buy | Sell |
|---|---|---|---|---|---|---|---|---|---|
Wristband |

|
1 | 3 | N/A | Band made of tanned leather. A small gold piece is reinforced with small metal fittings for secure wrist protection. | Potos Village, Pandora, Dwarf Village, Neko's | 45 | 30 | |
Elbow Pad |

|
2 | 4 | N/A | Elbow pads made of shock-absorbing material. Protect the whole elbow area. | Kippo Vilage, Dwarf Village, Pandora | 90 | 60 | |
Power Wrist |

|
4 | 7 | +5 Strength, +5 Attack | Mystical bracelet. When equipped its holy power is released and the "power" goes up by 2. | Dwarf Village, Pandora, Forest of Seasons. | 150 | 100 | |
Cobra Bracelet |

|
6 | 10 | Prevents poisoning. | A cobra-patterned armbands with mysterious powers. You can avoid being poisoned while equiping it. | Dwarf Village, Pandora, Forest of Seasons. | 280 | 186 | |
Wolf's Band |

|
8 | 13 | +5 agility. | A bracelet with the shape of a wolf with crimson eyes that lived a long time ago. When equipped, the defense increases by 2. | Dwarf Village, Pandora, Forest of Seasons. | 400 | 266 | |
Silver Band |

|
10 | 17 | Prevents unconsciousness. | It is a bracelet made of silver. When equipped, the "intelligence" rises by 2. | Kakkara, Todo Village, Neko's Crystal Forest Branch, Southtown, Northtown. | 525 | 320 | |
Golem Ring |

|
13 | 22 | Prevents petrification. | ? | Southtown, Northtown. | 750 | 500 | |
Frosty Ring |

|
16 | 28 | Prevents frosty. | Bracelet inscribed with a snow dharma pattern and an ancient spell as protection. | Northtown. | 1,200 | 800 | |
Ivy Amulet |

|
20 | 34 | Prevents being hit by Sleep Flower. | ? | Northtown. | 1,875 | 1,250 | |
Gold Bracelet |
File:Gold Bracelet SOM artwork.png | 24 | 43 | N/A | ? | Republic of Tasnica. | 3,750 | 2,500 | |
Shield Ring |

|
29 | 52 | N/A | ? | Gold City. | 5,100 | 3,400 | |
Lazuri Ring |

|
35 | 64 | + 5 intelligence. | ? | Gold City. | 8,800 | 5,866 | |
Guardian Ring |

|
41 | 78 | N/A | ? | Item Drop from Doom Swords. | N/A | 8,332 | |
Ninja Gloves |

|
91 | 241 | N/A | + 5 Agility, +10% Hit, prevent entanglement. | Item Drop from Dark Stalkers. | N/A | 16,000 | |
Dragon Ring |

|
92 | 242 | N/A | ? | Item Drop from Ice Thugs. | N/A | 20,666 | |
Watcher Ring |

|
93 | 243 | N/A | Prevents moogling. | Item Drop from Eggplant Men. | N/A | 25,000 | |
Imp's Ring |

|
94 | 244 | N/A | Prevents engulfment, frosty. | Item Drop from Ghosts. | N/A | 28,332 | |
Amulet Ring |

|
95 | 245 | N/A | Prevents petrification. | Item Drop from Tsunamis. | N/A | 32,000 | |
Faerie's Ring |

|
100 | 250 | N/A | + 5 agility, prevents petrification, poison, pygmy, frosty, dizzy, balloon. | Item Drop from Wolf Lords. | N/A | 36,666 |
Magic[edit]
|
| ||||||||||||||||||||||||||||||||||||||||||||||||||||||||||||||||||||||||||||||||||||||||||||||||||||||||||||||||||||||||||||||||||||||||||||||||||||||||||||||||||||||||||||||||||||||||||||||||||||||||||||||||||||||||||||||||||||||||||||||||
Enemies[edit]
Bosses[edit]
Development[edit]

Secret of Mana began development for the SNES CD-ROM, and was planned to be a launch title for the peripheral.[1] When the SNES CD-ROM was canceled, Square shifted Secret of Mana's development to the Super Nintendo. Similarly, Final Fantasy Adventure started development in 1987 as a Famicom Disk System title, Seiken Densetsu: The Emergence of Excalibur, before ultimately becoming a Game Boy game. When Secret of Mana shifted development to the Super Nintendo itself, the team had to remove a lot of content to fit it on a 16 megabit Super Nintendo cartridge, which is significantly smaller than a CD-ROM. One of the most significant removals was the ability to take multiple different routes, opening the possibility for several different endings.[2] Some of Secret of Mana's unused features found their way into Chrono Trigger, such as the numerous different endings.
Like several other Square-developed games for the Super Nintendo, Secret of Mana utilizes Mode 7, particularly when the party travels on Flammie high above the world map, as during this, the largely scaled and rotatable background gives the illusion that the ground below is three-dimensional.
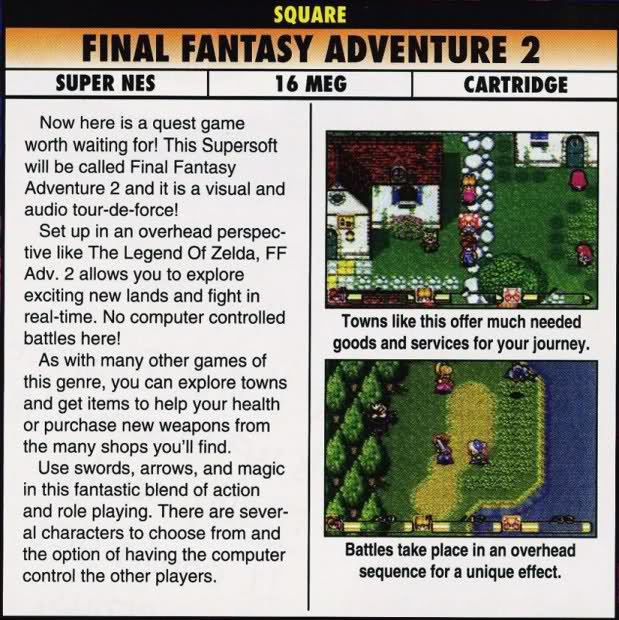
The English translation for Secret of Mana was worked on by Ted Woolsey, and was completed within 30 days, a month after the Japanese version was released. Within this short time frame, Ted Woolsey had little time to complete the game's translation, and portions of the game's script had to be removed due to space limitations.[3] In North America, prior to its release, Secret of Mana was titled Final Fantasy Adventure II,[4][5] indicating that it would be marketed as a Final Fantasy spinoff in a similar vein to how the first three SaGa games were released in North America as The Final Fantasy Legend, Final Fantasy Legend II, and Final Fantasy Legend III respectively. The idea was that the Final Fantasy Adventure series would focus more on action gameplay than the traditional RPG style of the main Final Fantasy series and the Final Fantasy Legend series. When Secret of Mana was chosen as the game's title, Mana became a entirely separate series from Final Fantasy not just in Japan but also in other regions.
Secret of Mana went on to be developed and ported across many more platforms as the SNES was eventually discontinued. The original game (with an updated translation and touch-focused player experience) first appeared in Japan circa 2009, and in the West from 2010. Available on both iOS/iPadOS and Android, this version has been updated frequently as mobile technology continues to evolve. However, the port became unusable on iOS for a period of six months in 2019 due to a rendering bug that presented in version 13 of the operating system. The bug was eventually patched out in the spring of 2020.
Gallery[edit]
- For this subject's image gallery, see Gallery:Secret of Mana.

Japan box art

Names in other languages[edit]
| Language | Name | Meaning |
|---|---|---|
| Japanese | 聖剣伝説2 Seiken Densetsu 2 |
The Legend of the Sacred Sword 2 |
External Links[edit]
- Secret of Mana Official Japanese Guide
- Secret of Mana Official Game Secrets
- Secret of Mana In-Depth: Magic Leveling Up FAQS by Xi
- Secret of Mana: An Armor and Weapons Data Table with a Brief Disscusion of Stats by Axen
References[edit]
- ^ "Classics Column #1: Desperately Seeking Seiken". 1UP.com (archive.is).
- ^ Retro Gamer issue 85, page 26.
- ^ Super Play issue 23, page 15.
- ^ Nintendo Power issue 51, page 67.
- ^ Electronic Gaming Monthly issue 45 (April 1993), page 90.
| Randi --"Whoa! What's a Rabite doing in a place like this?" | |
| This article is a stub. You can help the Wiki of Mana by expanding it. |
[Edit] Games in the Mana series
| |
|---|---|
| Main series | Final Fantasy Adventure • Secret of Mana • Trials of Mana • Dawn of Mana • Visions of Mana |
| Spinoffs | Legend of Mana • Children of Mana • Heroes of Mana • Friends of Mana • Circle of Mana • Rise of Mana • Echoes of Mana |
| Re-releases and compilations | Sword of Mana • Adventures of Mana • Secret of Mana • Collection of Mana • Trials of Mana |
| Related titles | Secret of Evermore |